A few months ago I got to work with the wonderful people at Elmer’s and throw a craft party! We had a BLAST! Then last month they invited me to participate in a “look for less” challenge. I was so excited, I had a hard time narrowing down the “look” I wanted to create my own version of. But I finally found something (on Pinterest of course).
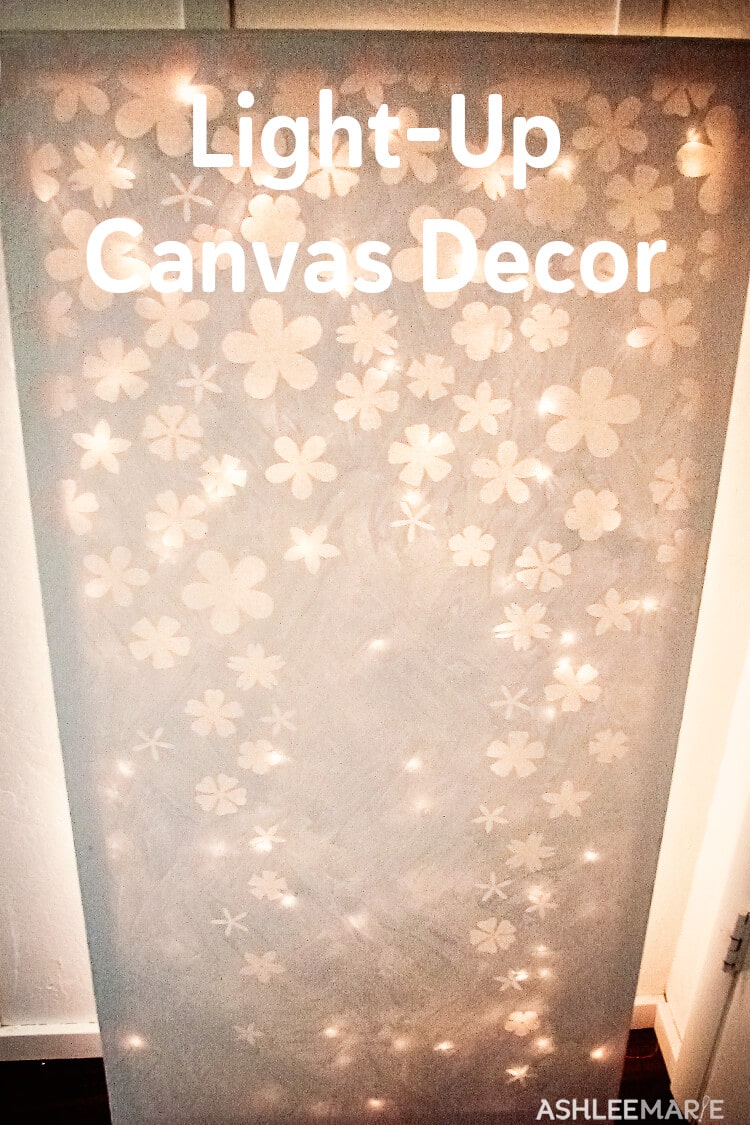
I fell in LOVE with these pieces by Valerie Boy (as seen on Apartment Therapy). My version… and Valerie-Boy’s.
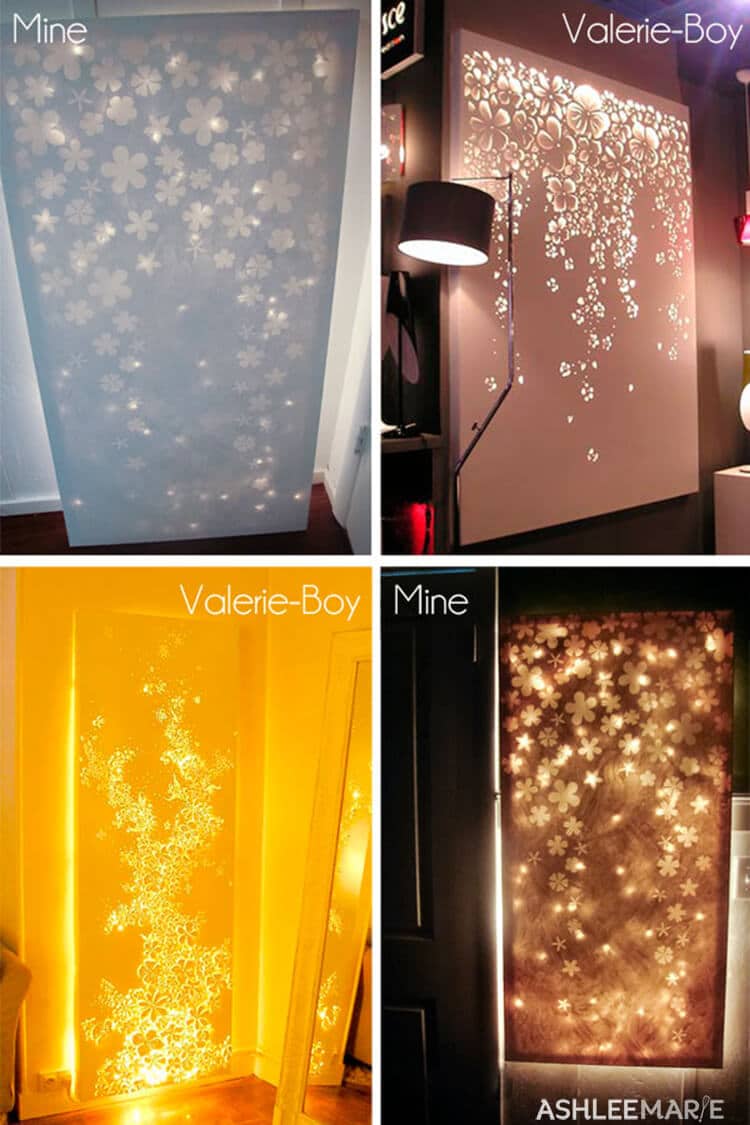
Her’s is made of powdered metal cut and bent, mine is Canvas, paint and lights! Her’s cost an arm and a leg (and a first born) and mine was a grand total of $25!
I had a weird wall space I wanted to cover so I went with a long and narrow canvas that I picked using a 50% off coupon! This is 24″ x 48″ that I got for $25 (the only thing I had to pay for!)! The perfect size for my project.
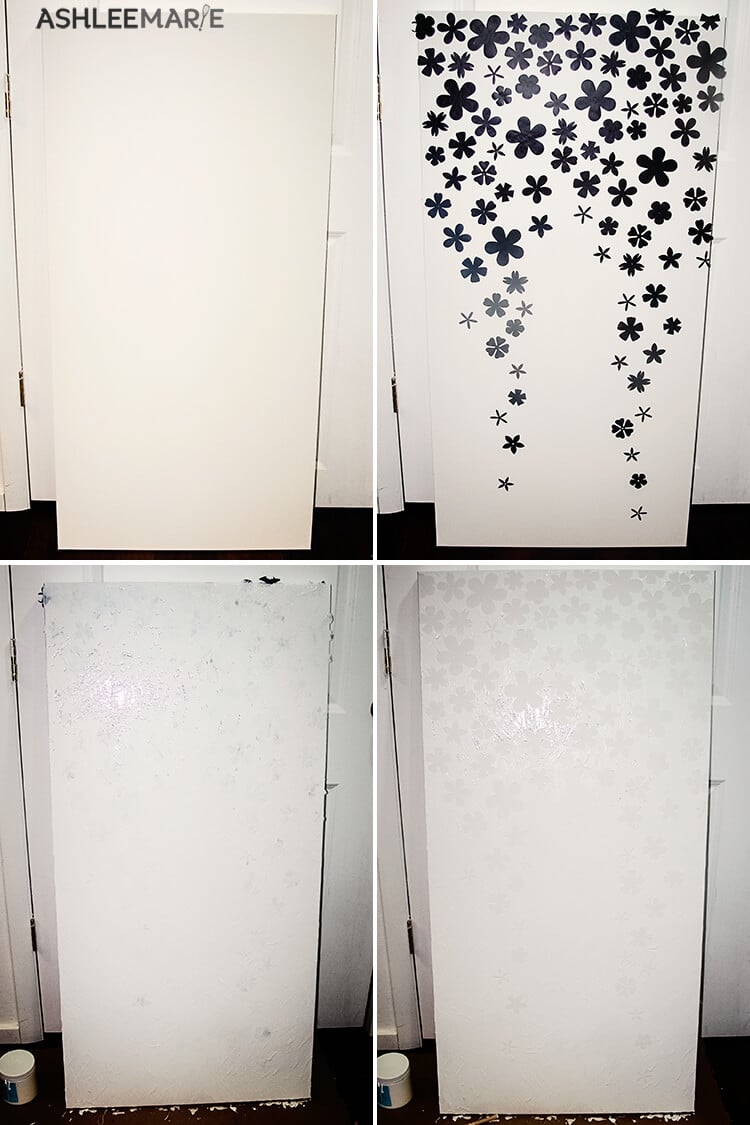

Next I used the X-ACTO Designer Series Gripster Knife and cut flowers out of black cardstock that I had on hand (so I could see it through the paint), then using CraftBond Repositionable Glue Stick I stuck, (and removed and re-stuck until I like the placement) the flowers onto the canvas! AWESOME, I am already in love!
Next I used some thick Acrylic paint all over the front, in 2 coats. I used big strokes going for a thick chunky look. But you could paint it on pretty smooth if you wanted. I kind of wish I’d gone for 3 coats, but I wanted to peel off the flowers while it was still wet, and before they were stuck on for good.
Next, obviously, I peeled up the black paper. There was something very satisfying about peeling it all up!
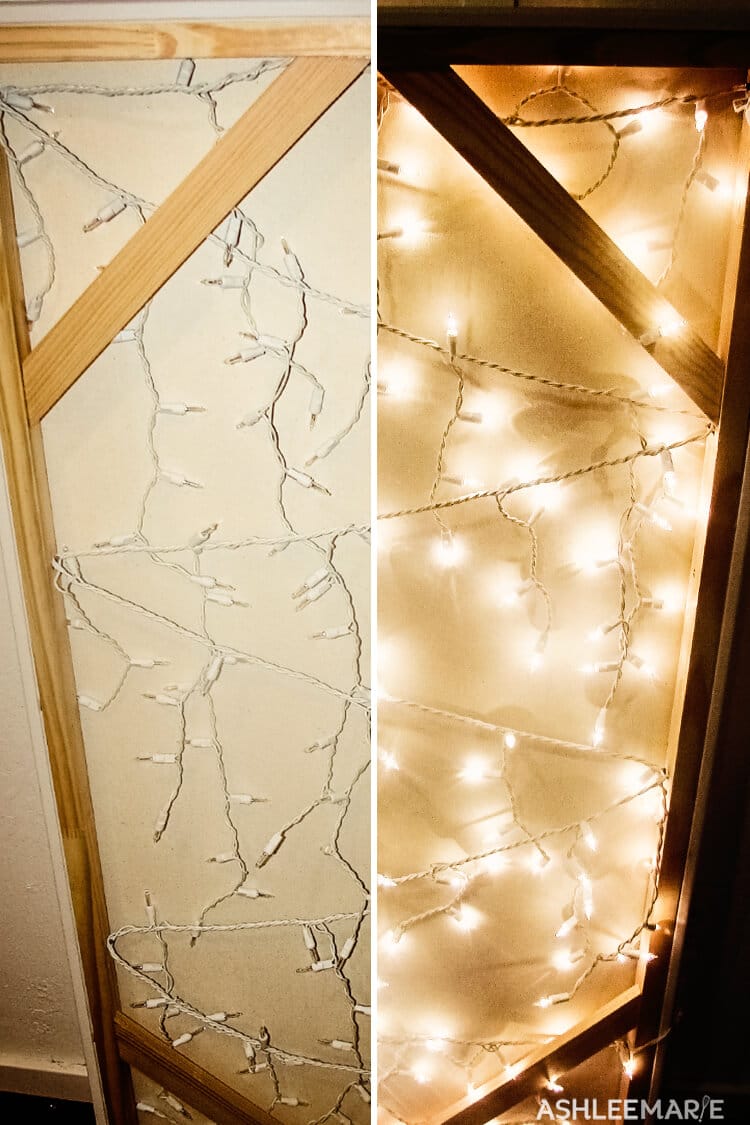
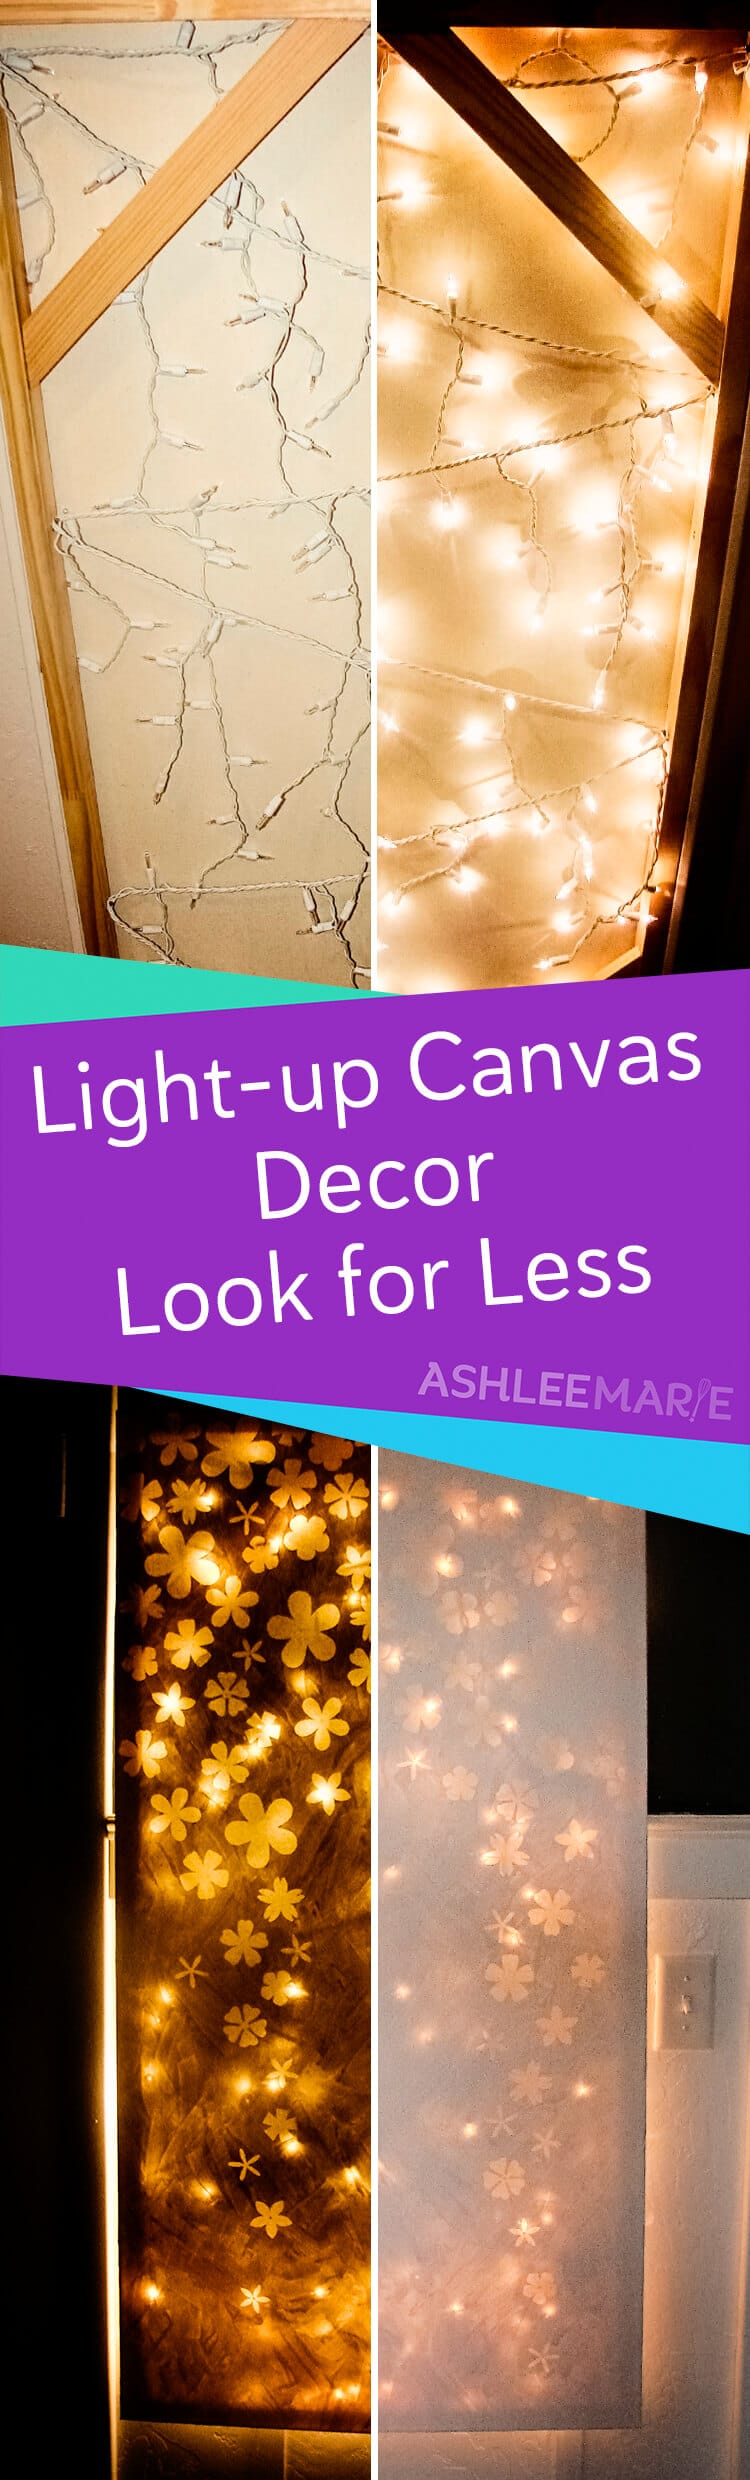
I let it dry overnight! I was planning on using a fancy expensive light to light up the back, but then I laid eyes on my icicle lights (in a pile of throw away- no more icicle lights for me- what were we ever thinking? So messy looking). Anyway I used some nails to attach the lights (I nailed them half way in then bent them over the lights) in a criss-cross pattern to cover the whole back.
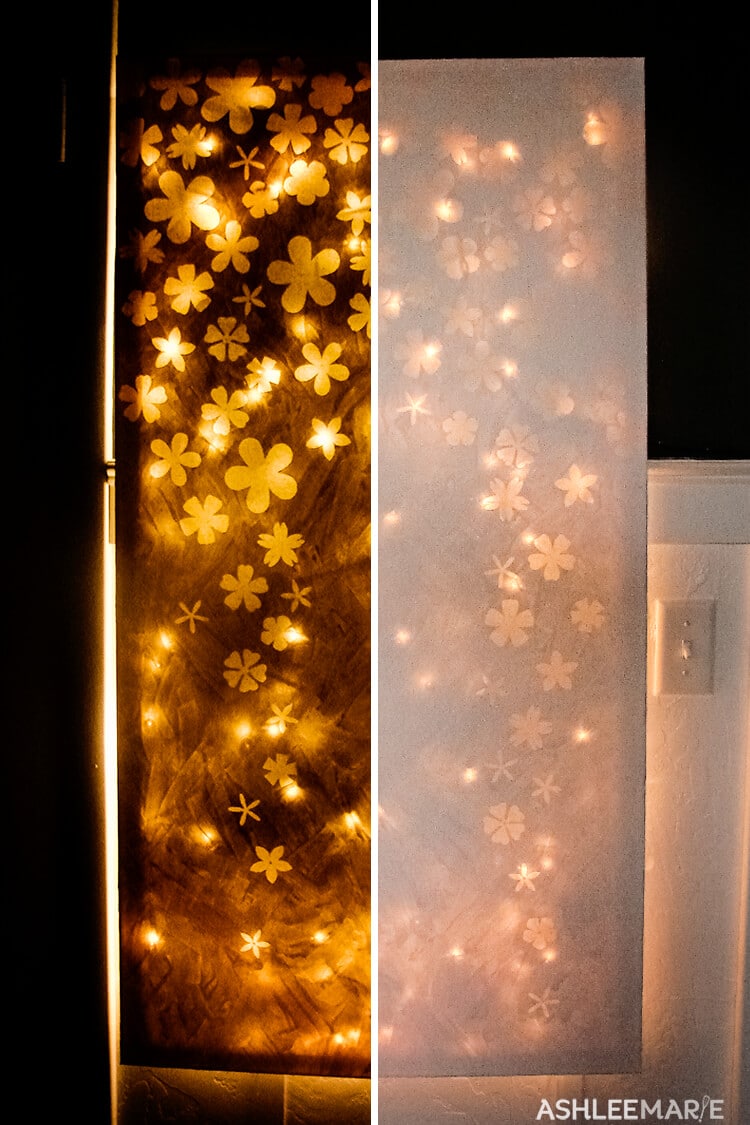

And they work! Not QUITE the look I was going for, but the back is lit, and it’s MUCH cheaper than buying some fancy, heavy lights trying to get them to work. (notice this is with a flash)
So my weird wall space, between two doors I have this narrow space with this HUGE, ugly electrical panel. I haven’t found anything to cover it with so this was the perfect chance! I love it there. It’s off centered for 2 reasons, 1) to cover the panel and 2) to leave the light switch uncovered. I don’t want it to fall off the wall as the kids try to turn on lights! (no flash but the middle of the day)
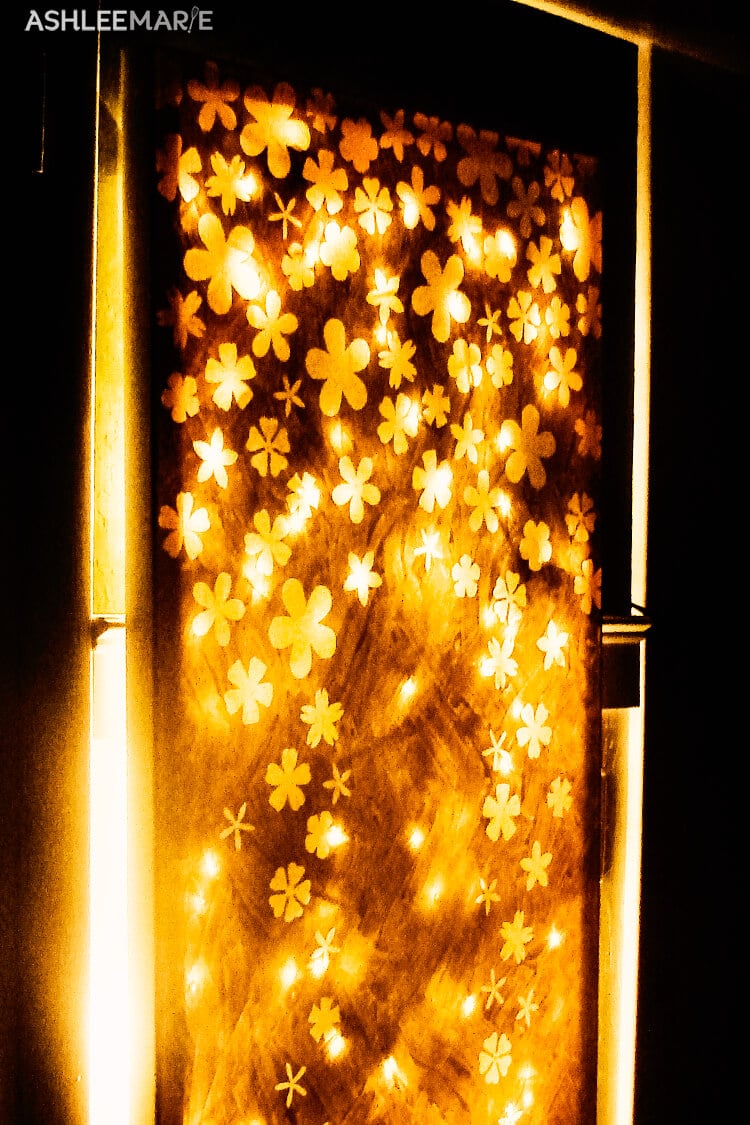

And all light up in the dark! I love it! Of course it’s hard to really capture lit up pieces with cameras! SO come on by and check it out! (no flash at night)
I finished my project a few weeks ago BUT with all my computer issues I haven’t been able to post it, so I’m the LAST blogger whose participating to get my project up! Gah… my computer issues are a pain, but when they mess up something I’m doing for someone else it frustrates me to no end! Lucky for me Elmer’s not only has wonderful products, but they also have amazing people working there, they have been so patient with me
I was given free product to review and use for this project, but all opinions are my own


Leanne
Ashlee, that is gorgeous! I want to make one now (um, after Christmas)!
Ashlee
Thanks so much!!! Can’t wait to see what you make!
Trena alexei
Hello Ashlee, I know it sould weird to ask. Could u mind to make this i would willing to pay u 50 dollar plus shipping to send here? Let me know
Ashlee
sorry, I have no interest in making and selling items. Just sharing how I did it so others can do it! I’m very flattered though!
Lulin fu
Hey Ashley guess I just left some comment in the wrong place .. But my question is the lights.. Do they need to be plugged in the socket all the time or how you managed it?
Catrin
Wow… Seriously. Thanks for sharing this. I might have to this, like right now.
You got yourself a new follower…
found oyu throught the Sew Can Do Linkie Party
Greetings from Germany
Catrin
Ashlee
Thanks so much! Don’t forget to come back and show me what you did with it!
marilyn
This is so amazing….I have GOT to try this!!! I found you on somewhat simple’s party. Thanks so much for sharing!
Ashlee
Thank you so much!!! link back up if you do it! I’d love to see what you come up with!
Rachel
Oh wow!!! This is so pretty!!! Amazing!!!
I have a linky party going on if you want to join… http://sprinklesomefun.com/2012/01/vanilla-bean-iced-coffee-and-project.html
-Rachel @BubblyNatureCreations.com
Ashlee
Thanks so much! It was really fun to make, and I’m super happy with how it turned out!
Leanne
I love this Ashlee! Thanks for linking to the party! I’m featuring this on my blog today!
Ashlee
Thanks so much!!! What a treat! Of course you’ve seen how much better it looks in real life…
Elisa
Hi! I LOVE this! I will defenitely have to try it!
Ashlee
Thanks so much! Come bake and link up if you end up making it! I’d love to see what else people come up with!
Vim
Wow, you made something look so easy to make! I think I’ll follow your steps and create one myself. I think this would even be a nice dining room accent.
Ashlee
Thanks! I really was easy, I hope you make it and love it!
Mistie
I’m soooo excited to try this. I want to put in my bedroom. Thanks for sharing!
Ashlee
That’s GREAT!! Send pictures when you do! I love seeing what other people create from my stuff!
geraly
zomg… BIGGEST. NIGHT LIGHT. EVAAAAAAAAAAAAAAAAAAAAR!!! it’s awesome! :0)
Ashlee
Agree! We leave it on in the hall all the time and the kids no longer need the bathroom light on all night! Money saver for SURE!
Candace
Probably a strange question, but..can you paint the canvas a darker color like a blue? I want something with color in my dinning room.
Thanks for such simple instructions.
Ashlee
Yes of course! Any color with work, but the blank area where the vinyl flower was will be canvas color, so it won’t quite be the same effect.
Tricia
Did you just use white acrylic paint? It looks almost like a very light blue in one of the pictures
Ashlee
It’s white! it’s hard to do indoor lighting well with a point and shoot, I should retake them with my new camera and see if I can’t get better images!
Angela
This may be a silly question but what kind of canvas is it? Is it one that came on a frame already and was unpainted? You know how most come already prepaired for painters? I would love to create one of these but feel a bit lost on the materials… Thank you for sharing this idea! 🙂
Ashlee
on a frame from michaels. Just the white ones they have there, It never occurred to me that there might be anything special about them or I would have written down more info, I’m so sorry and I hope that helps!
annmarie
im confused is this a stretched canvas or a pre framed
Ashlee
I bought pre framed
Leslie
I’d like it if it were more opaque. I was thinking that would happen if you gessoed it, but maybe gesso dries too fast, and you really should cover it with acrylic after, (otherwise it gets dirty easily, and is not cleanable) so you’d def have to wait til it dried. I read a Pinterest link to make your own chalkboard paint. That would probably be pretty opaque, but I don’t know how fast it dries. You have to add “unsanded grout” to acrylic paint.
Ashlee
I wanted it to be opaque, but it didn’t work out, I wanted lots of texture, and homemade chalkboard paint is pretty runny still (I’ve worked with it a lot). I should have just done another layer, and I’m actually switching out the christmas lights (that I had on hand) for 2 lights I’m going to attach at the top and bottom so it’s just a glow behind it, rather than the spots of light.
Grazielle
Uauuuuuuuuu!!!!!!!!!!!!!!!!!!!!!!!!!Um espetáculo, incrível,inspirador.Parabéns!!!!!
A criatividade é algo q surpreende e me deixa admirada com a capacidade de pessoas como vc. ótimo.Amei,Adorei fiquei de boca aberta.Mais um vez Parabéns q esta capacidade de criar,de modificar cresça a cada dia.
Ashlee
Thank you!
jo
Olá gostei muito, belo trabalho, irei tentar para colocar em um casamento agora em Dezembro, ainda não entendi como é feito os desenhos na tela, mais vou dar meus pulos por aqui no Brasil…. bye
Ashlee
I’m happy to explain more if you let me know what part is unclear
Sarah
Can you give us a more detailed tutorial?that would be great thanks!
Ashlee
ummmm more detailed than the step by step I already posted? i’m not sure what your looking for. is there a specific part your having a hard time with?
Rute Moraes Martins
Muito lindo seu trabalho, uma novidade para mim!! estava mesmo querendo fazer algo novo para minha casa e talvez ganhar algum dinheiro com um trabalho tão diferente, gostaria que você me enviasse mais idéias que você criou. Sou Brasileira e não sei Inglês, espero que você entenda o meu pedido!! Parabéns !!!muito lindos e fáceis de realizar!! espero que compartilhe de mais idéias comigo!!
Obrigada Rute M.Martins
Ashlee
Thank you so much! I’m so glad you like my project, as for sending you more ideas feel free to browse my blog, and subscribe to the emails to get updates every time I post!
Vanina
Hi: any video explication who is? Please! Beatiful
Ashlee
no I’m sorry, you just buy a canvas, stick vinyl or stickers on it, paint over it, peel up the stickers and back light. It would be a pretty boring video!
Lulin fu
Yes, ummm actually it’s so simple an idea but it’s so beautiful .. I wanna try it for two weird boards the end of the staircase in my house.. Thank you so much for so much detail about your project.
Caroline
Hey Ashlee that is amazing! I’m hoping over this spring break i can make this to put in my dorm. I was wondering could I do this same project with a colored canvas? I wasn’t sure how that would effect the lighting of it. Thanks so much!
Ashlee
you totally could, this light doesn’t actually give off light, just a glow. so the glow would be a bit different! I think that would look AMAZING!
bianca
HI Ashlee!
What color paint did you use?
Thanks!
Ashlee
Ummm this was just a plain white really thick artist acrylic paint!