It’s done! My room stencil is done and we’re moving into our room! It only took a year! My sister in law moved out of the extra two rooms in the basement last year and while I moved in to the office right away the bedroom has taken longer. It’s been the thing we’ve been putting off in favor of more urgent things over and over again, but I finally got it done, and just in time for the baby to come! (warning: the color of the walls isn’t quite right, no matter how I worked in photoshop I couldn’t get it quite right!)
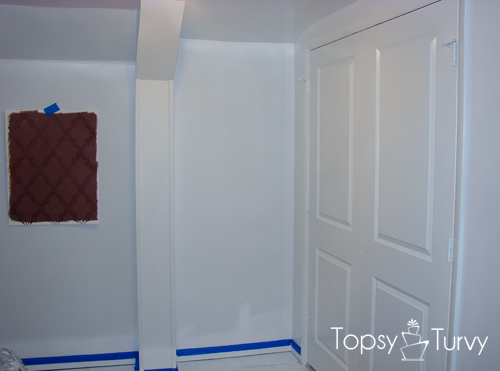
We actually had to start with getting the walls repaired and textured. THEN I put up the trim, primed and finally did high gloss white on the trim, doors and ceiling. Then picking the colors! I considered grey because grey is so popular, BUT I kind of don’t like it. I hate yellows, creams, and cool colors. I like warms, so we decided to go with browns. It actually took 3 days of playing with paint for us to decide what colors to work with.
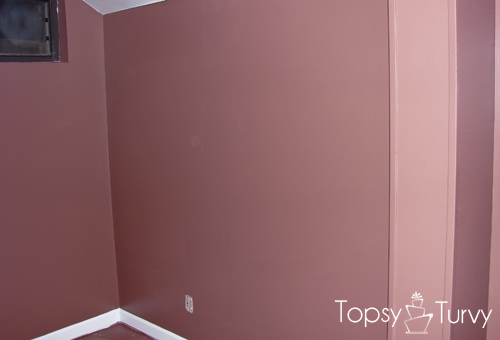
The base color is an eggshell dark brown that’s on the purplish side. In the store it looks very purple, but in our small bedroom with no natural light it looks great! We love it! I was worried it would be a bit too dark and make the room feel closed in, but we decided to go for it anyway! I actually took two colors of the brown a shade a part and mixed them to be our base color.
Now for the stencil… I actually kept changing what I wanted over the past year, I’ve gone through different ideas, from a cherry blossom tree, to a stencil, to different kinds of stencils, etc… Finally decided to go with a double trellis, BUT I didn’t want to hand pencil and then hand paint the entire room (pregnant… not enough time before the baby came). SO I decided to make my own stencil.

I started by designing the stencil on Photoshop, then I drew a grid onto the EZ-cut plastic I bought from PJ stencils. I drew the grid so I could keep all the stencils in line, it’s so easy to get off track if you don’t.
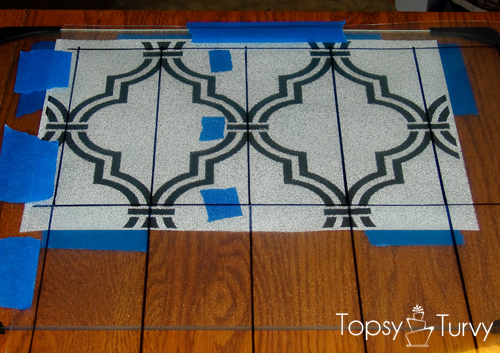
I originally planned on doing a 4×5 trellis, but it made the stencil too flimsy. SO I changed it and cut every other stencil to make it stronger… I know it doesn’t make sense, but when you see it down below on the wall you’ll get it (I hope).
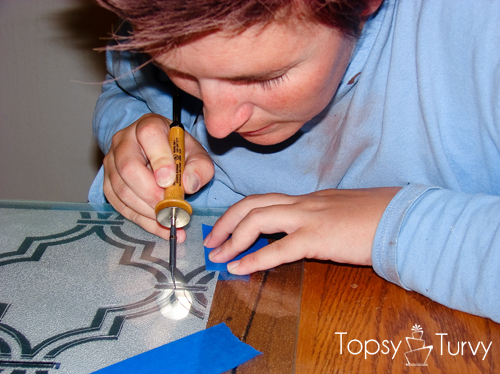
Using the stencils electric cutter I cut it all out! It was amazing. It totally cut quickly and easily, I did it all in one afternoon! It was actually really fun to do, I love stuff like that! popping out the plastic pieces after cutting was super fun too!
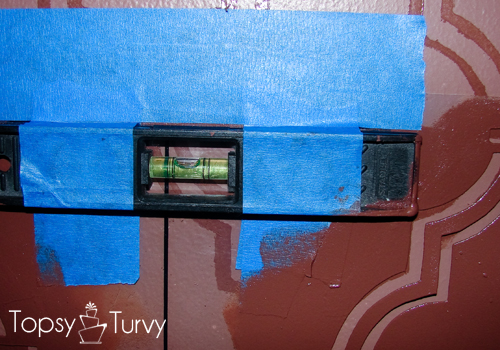
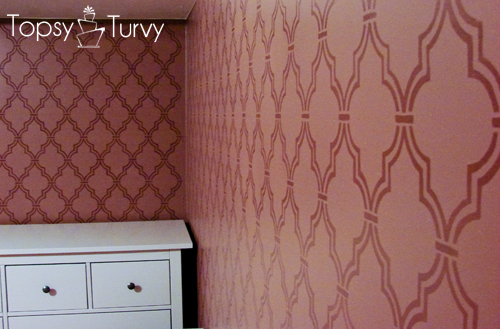
Kay, when I started painting the stencil I added a level to the top of the stencil and made sure it was level every time I painted. clearly I didn’t take this picture until later. (and back to the off color of the pictures- See how different the stencil color is on the picture above vs below? And neither are quite right!)
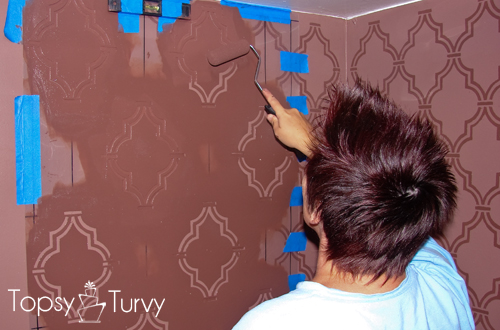
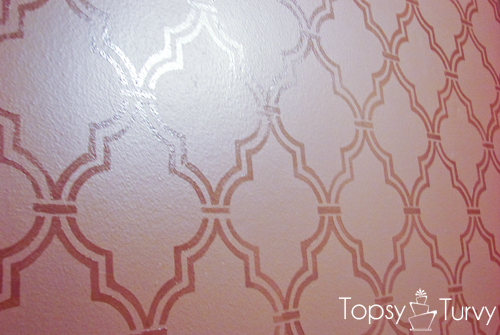
I used a small sponge roller to paint the high gloss layer on. (remember how I said up above I used two shades of brown mixed for the under wall color? So can you see what I was talking about with the stencil cut every OTHER stencil image. Than you just move the stencil over one to fill in the voids. Okay, I really REALLY hope that made sense to you guys.
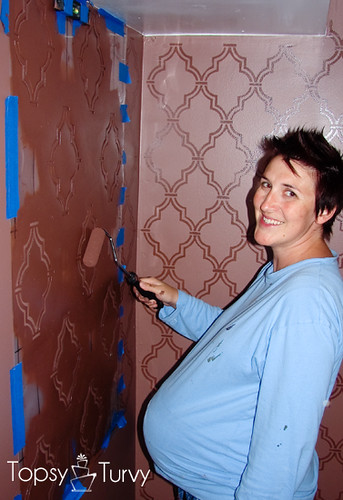
Well I used the darker shade in a high gloss for the stencil color, so the color is only supposed to be half a shade off, so the shine would really create the pop, but it ended a bit more extreme, but we really like it!!! (the above picture is probably the closest to the actual color of the walls… and yes, I’m 37 weeks pregnant here!)
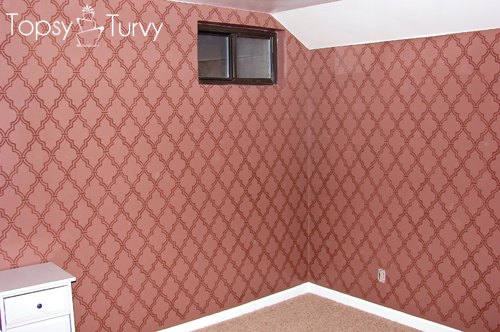
And it’s finished! This is the corner where the bed is going to go… (under our “window”). This room is so much smaller than our other room only one of our three dressers fits, we can’t fit our bookshelves (so I’m building my own shelves!). Now I need to design a headboard of some kind…. Any suggestions?
I’m thinking of doing a mirror wall over that dresser on the wall… Anything I can do to make this small room feel bigger! Any other suggestions? I’m also building a simple desk for my husband along with some more shelves for him. So we’re not QUITE done yet, but we’re getting closer. My husband got his clothes moved over before the baby arrived, but I still have to move over my stuff (but which ones? the normal clothes, the maternity clothes, the fat clothes? ALL the clothes?)


Kalyn Ernest
This is just GORGEOUS!!!!!! I wish I had your patience, I would have quit on day one. Great job!
Ashlee
Thank you so much! It actually went pretty fast with the stencil. Not like the gals who HAND PAINT this design in their rooms!
Leanne
This looks so good Ashlee. You did a beautiful job. I love the color too.
Ashlee
Thanks so much Leanne! I wish the coloring came across better in the pictures, but with such a small window and no natural light it’s hard to really capture. I need a better camera for that!
Jenny @ Simcoe Street
Beautiful!!
I’m your newest official follower
Come by if you have a sec and, if you’d like, maybe follow me too
Jenny
http://www.simcoestreet.blogspot.com
Ashlee
Thanks so much! It was a fun wall/stencil to do! I love how it turned out too.
Kahli
Great job! And it obviously took lots of patience! That patience will come in handy when the baby is due 🙂
Ashlee
The baby actually arrived a few weeks ago, but I just got around to posting the wall stencil. I did that the week before he was born! It actually went pretty fast, stencils are a nice way to go. Better than hand doing it!
Jane
Wow… when I was in the 36th week, I couldn’t do _anything_ at all (well, I didn’t get past the 36th week anyway, but that’s ok for being pregnant with twins I guess).
I love the stencil that you made and I love your choice of colors. Very very well done!
All the best wishes for you and your baby.
Ashlee
I’m pretty sure twins would have had me off me feet more too! Since I was on “take-it-easy” rest (not QUITE bedrest this time) until week 37 I had to wait until that point to get all of this done. As soon as I hit 37 weeks I primed, painted and stenciled this room in a matter of days. Thank you so much!
Michelle at Faith, Trust, & Pixie Dust
So pretty! I have a similar stencil & I’m excited to use it.
Warmly, MIchelle
PS – Hope to see you at SNAP – I bought my tickets!
Ashlee
I’ll be there (at Snap) I already have my ticket too! Can’t wait to see your stencil!
Brook
Wow! Looks totally amazing. I just bought a stencil today to try the back of a bookshelf. I can’t imagine doing a whole room!
Ashlee
Having such a big stencil helped. Using a small stencil would take much longer, but work better for smaller spaces!
Ruth
I would love to be able to make a stencil like this on Photoshop. Your room looks gorgeous. Can’t wait to see all the extra projects you have planned.
Ruth
Ashlee
Thanks! it really wasn’t too hard, plus I love working with photoshop. I hope I get around to FINISHING my extra projects soon!
Kimberlee
That came out lovely. I new you could do small stencils, but I didn’t realize you could make one large enough to do a wall. Love the glossy on flat paints.
~Kimberlee
Ashlee
Thanks! I wasn’t sure if a large stencil would work, but figured it was worth a shot! I’m so glad I did, it made it go SO much faster!
Brooke @ Inside-Out Design
Wow, it’s beautiful!! I did my first stencil project a few months ago; a trellis design on a table top. I know what you mean about how easy it is to get off track with those things. Love the picture of you painting while pregnant! That is so me- always trying to get a project done before a deadline. It makes it so much more motivating though! I saw on a comment above that you had the baby already- congrats!!
Ashlee
Thanks! I actually had the baby before I got around to posting these. Most of my projects are done days if not weeks or sometimes even months (years a few times) before I get around to posting them!
Jamie
I just wanted to let you know that I featured your project today on “You Sew Rock Me Fridays” on my blog Sew Rockin’. Awesome job! I can’t wait to see what you come up with in the future!
You can find the post at http://www.sewrockin.com/2011/10/28/you-sew-rock-me-fridays-2/
Jamie @ sewrockin.com
Ashlee
Thank you so much! what a fun feature, I’m so glad you like my wall!
Cali Rutter
Ashlee you just MADE my day!! I have been looking online ALL day for tips for making my own stencil. I’m facebooking you about this right now!!
Ashlee
I can’t wait to see your stencil!!!!
Abbie (Five days...5 ways)
Oh my goodness! It turned out sooooo great! I’ve done almost this exact same design on a pair of French doors, but I did not painstaking grid everything like you did.
Well done!
I would be thrilled if you would link this up at my second ever Feature Friday FREE-FOR-ALL…going on right now (we had almost 300 links last week…can you tell I’m excited??! : ))
http://misformama.net/2012/01/feature-friday-free-for-all-2.html
Would love to have you by for a visit!
P.S. I’m a new follower. : )
~Abbie (www.fivedaysfiveways.com)
Ashlee
Thanks so much! I like that you have different thigns on different days. I do the same thing, but they aren’t all titled! Monday is recipes and food, tuesday the party, weds cakes of some kind thurs crafts and friday is a catch all of giveaways, revies, parties and home stuff (the stuff that doesn’t come up as often!)